Trade Connector Developer's Guide
This document describes how to develop, deploy, and test custom trading connector in Ember.
Overview
Trading Connector and Trading Algorithm has a lot of similarities. Both receive orders and report order events. Ember uses similar container services for algorithms and connectors.
Required Reading
This document is relatively brief. If you need to develop a trading connector, start by reading short Trading Data Model API document, followed by Algorithm Developers Guide. This document will only cover aspects specific to trading connectors.
Samples
Source code of sample trading connectors can be found on github.
State
It is always better to keep trading connector logic stateless. Connector is essentially an API transformer. It converts trading signals from Deltix Trading API to the API of trading venue. In many cases these conversions can be done in stateless manner (when all information can be extracted from input message). For example, if connector receives cancel confirmation for some order the only piece of information required for OMS is order identity.
Having said that, sometimes connectors need to maintain their state. This state can be restored on each system restart from system journal. Server replays historical trade requests to each connector during BOOTSTRAP phase.
Order Identity
In Deltix Trading API order identity is represented by a pair { INT64 Order Source ID, TEXT Order ID }.
In ideal case this composite identity can be converted to in vendor API. For example, for vendors who use fairly large text to represent client order identity, one possible solution is to append SourceID and Order ID together. A special separator character or a fixed size representation of Source ID number can be used to parse original pair when order events are reported by vendor.
Another solution can be used when vendor allows custom order attributes, and these attributes are played back on vendor order events. In this case Deltix order identity can be stored as custom attributes while some synthetic ID can be associated with each order.
When no workarounds exist Connector can keep Order ID mapping table as a part of State.
Threading Model
Each connector has inbound queue of trading requests. The queue is handled by dedicated thread TradingConnectorWorker. While connector can create additional threads, we recommend doing all the polling inside the main worker thread.
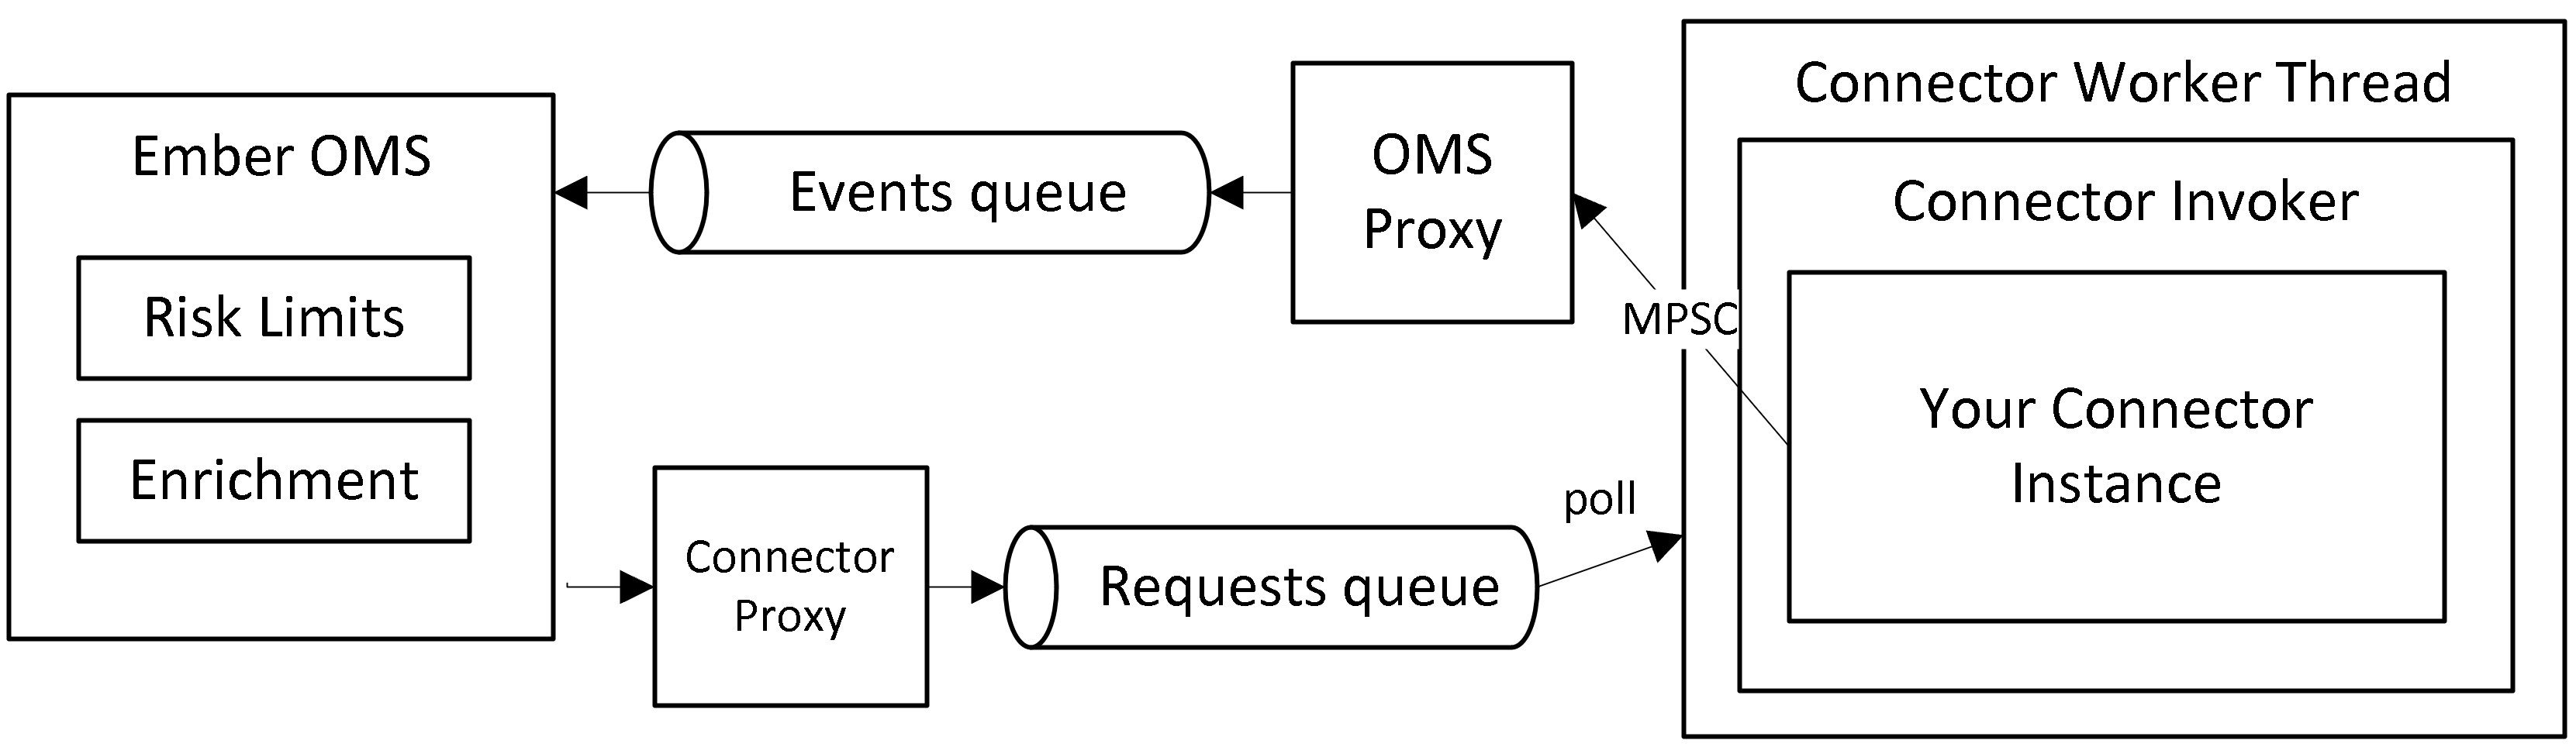 Simply extend tagging interface
 ServiceWorkerAware to execute timers (see ExclusiveTimer API) and do additional polling.
When downstream API forces you to use additional thread (to handle inbound trading events from execution venue) try to avoid any inter-thread communication. This is where stateless approach model shines.
In any case when publishing events back to OMS please be assured that OMS Queue is thread safe.
Connector Context
Each connector at creation time is provided with TradeConnectorContext. This API provides:
- Source (and numeric Source ID) under which your connector instance is deployed. Use this ID to initialize Source ID of outbound events.
- Ember OMS services (sink for connector events).
- Thread Factory to create additional event handler threads that can be pinned to specific CPU cores at runtime.
- Counter Factory to define performance counters helpful for system monitoring (e.g. bytes sent/received from downstream link).
- Instrument Metadata snapshot.
Instrument Metadata (Security Master)
Deltix systems use special TimeBase stream "securities" to keep information about all instruments. Each instrument in this stream may have custom attributes defined for each destination trading venue. For example, vendor-specific symbology or price and size multipliers. See API section Security Metadata later in API section.
Connectors have access to this stream in the following two ways:
- At creation time connector may access a snapshot of the currently known list of securities via
TradeConnectorContext. - At run time updates about securities are broadcasted via
InstrumentUpdateHandlerset of callbacks that each connector has.
API
Data model
Read Deltix Trading Data model document to familiarize yourself with requests and events that are processed by trading connectors.
Request Handler
Each connector implements Order Request Handler interface shown below:
public interface OrderRequestHandler {
    void onNewOrderRequest(NewOrderRequest request);
    void onCancelOrderRequest(CancelOrderRequest request);
    void onReplaceOrderRequest(ReplaceOrderRequest request);
    void onOrderStatusRequest(OrderStatusRequest request);
}
Event Emitter
Connectors emit Order Events to communicate order status updates and fills to order source. Use TradeConnectorContext.getEmber() method to obtain “event sink” OrderEventHandler interface.
public interface OrderEventHandler {
   void onOrderPendingNewEvent(OrderPendingNewEvent event);
   void onOrderNewEvent(OrderNewEvent event);
   void onOrderRejectEvent(OrderRejectEvent event);
   void onOrderPendingCancelEvent(OrderPendingCancelEvent event);
   void onOrderCancelEvent(OrderCancelEvent event);
   void onOrderCancelRejectEvent(OrderCancelRejectEvent event);
   void onOrderPendingReplaceEvent(OrderPendingReplaceEvent event);
   void onOrderReplaceEvent(OrderReplaceEvent event);
   void onOrderReplaceRejectEvent(OrderReplaceRejectEvent event);
   void onOrderTradeReportEvent(OrderTradeReportEvent event);
   void onOrderTradeCancelEvent(OrderTradeCancelEvent event);
   void onOrderTradeCorrectEvent(OrderTradeCorrectEvent event);
   void onOrderStatusEvent(OrderStatusEvent event);
   void onOrderRestateEvent(OrderRestateEvent event);
}
Required Event attributes
Each event has a lot of attributes, many of which are optional. All events you need the following attributes:
- SourceId - identifies connector instance issuing event
- DestinationId - mirrors order sourceID
- OrderId - also must be provided
- Timestamp - must be filled as well
In addition, specific events may require additional attributes. For example, for FILL events you also need to report:
- (TradePrice and TradeQuantity) or (AveragePrice and CumulativeQuantity)
- EventID - required if destination supports partial fills or fill corrections/busts
It may be a good idea to report current order State as well as Remaining Quantity (when available in downstream API). While Ember can derive this information, it will make sure that internally computed state matches the one you report.
Do not forget that order requests and order events have reversed source/destination attributes. Requests come from traders (source) to connectors (destination). Events come from trade connectors (identified by event source) to order origin (identified by event destination).
For example, the following example shows how we can acknowledge order:
@Override
public void onReplaceOrderRequest(OrderReplaceRequest request) {
   if (nodeStatus == NodeStatus.LEADER) {  // note#1
       MutableOrderNewEvent event = orderNewEvent;
       event.reuse(); // note#2

       event.setSourceId(id);
       event.setDestinationId(request.getSourceId());
       event.setOrderId(request.getOrderId());
       event.setTimestamp(clock.time());

       orderEventHandler.onOrderNewEvent(event); // note#3
   }
}
Few Notes:
- As you can see, we only emit events in the Leader state. More on this important aspect later in this document.
- Avoid memory allocations - we recommend reusing event instances. When event is reported to ember it is serialized into OMS queue and the same event instance can be reused for the next event of the same type.
OrderEventHandlerfield was previously initialized fromTradeConnectorContext.getEmber()method. This handler will serialize passed event instance into ember queue. You can re-use event instance immediately after this call for the next event you want to send.
Now let us see how to report order rejection:
MutableOrderRejectEvent event = …
event.setSourceId(id);
event.setDestinationId(request.getSourceId());
event.setOrderId(request.getOrderId());
event.setTimestamp(clock.time());
event.setReason(“Explain what went wrong here”);
orderEventHandler.onOrderRejectEvent(event);
Order cancellation confirmation can be reported similarly:
MutableOrderCancelEvent event = …
event.setSourceId(id);
event.setDestinationId(request.getSourceId());
event.setOrderId(request.getOrderId());
event.setTimestamp(clock.time());
event.setReason(“Cancelled by exchange”);
orderEventHandler.onOrderCancelEvent(event);
As the next sample we will demonstrate how to report a fill:
MutableOrderTradeEvent event = …
event.setSourceId(id);
event.setDestinationId(request.getSourceId());
event.setOrderId(request.getOrderId());
event.setTimestamp(clock.time());
event.setEventId(“FILL00001”);
event.setTradeQuantity(Decimal64Utils.fromInt(100));
event.setTradePrice(Decimal64Utils.fromDouble(15.01));
orderEventHandler.onOrderTradeReportEvent(event);
There are two method to report partial fills – incremental and cumulative. Imagine that we have an order to buy 100 lots of some contract. And order receives two partial fills for 10 and 50 lots. Incremental method would report each fill:
…
event.setEventId(“FILL00001”);
event.setTradeQuantity(Decimal64Utils.fromInt(10));
event.setTradePrice(Decimal64Utils.fromDouble(15.01));
orderEventHandler.onOrderTradeReportEvent(event);

…
event.setEventId(“FILL00002”);
event.setTradeQuantity(Decimal64Utils.fromInt(50));
event.setTradePrice(Decimal64Utils.fromDouble(15.02));
orderEventHandler.onOrderTradeReportEvent(event);
Cumulative reporting method uses cumulativeQuantity and averagePrice to report current totals:
…
event.setCumulativeQuantity(Decimal64Utils.fromInt(10));
event.setTradePrice(Decimal64Utils.fromDouble(15.01));
orderEventHandler.onOrderTradeReportEvent(event);

…
event.setCumulativeQuantity(Decimal64Utils.fromInt(60)); // 10+50
event.setAveragePrice(Decimal64Utils.fromDouble(15.01833));
orderEventHandler.onOrderTradeReportEvent(event);
You can mix both methods even when reporting fills for the same order:
…
event.setEventId(“FILL00001”);
event.setTradeQuantity(Decimal64Utils.fromInt(10));
event.setTradePrice(Decimal64Utils.fromDouble(15.01));
orderEventHandler.onOrderTradeReportEvent(event);

…
event.setEventId(null);                                 // clean
event.setTradeQuantity(Decimal64Utils.NaN);              // clean
event.setTradePrice(Decimal64Utils.NaN);                 // clean
event.setCumulativeQuantity(Decimal64Utils.fromInt(60)); // 10+50
event.setAveragePrice(Decimal64Utils.fromDouble(15.01833));
orderEventHandler.onOrderTradeReportEvent(event);
Notice how we cleaned up incremental fill attributes before reusing event.
Lastly, remember that incremental fill reporting method requires you to supply event ID for each fill. This is not strictly required, but highly recommended. Event ID must be unique at least in scope of single order. It is used to detect possible duplicate fills that sometimes may be reported due to disconnects or state re-synchronization procedures.
One more example to finish this section. Here we show how to acknowledge order replacement request:
MutableOrderReplaceEvent event = orderReplaceEvent;
event.reuse();

event.setOrderStatus(OrderStatus.REPLACED);
event.setSourceId(id);
event.setDestinationId(request.getSourceId());
event.setOrderId(request.getOrderId());
event.setOriginalOrderId(request.getOriginalOrderId());
event.setTraderId(request.getTraderId());
event.setAccount(request.getAccount());
event.setExchangeId(request.getExchangeId());
event.setEventId(incrementFormattedNumber(eventId));
event.setSymbol(request.getSymbol());
event.setInstrumentType(request.getInstrumentType());
event.setSide(request.getSide());
event.setTimestamp(clock.time());
event.setExternalOrderId(makeExternalOrderId(request.getSourceId(), request.getOrderId()));
event.setAveragePrice(0);
event.setCumulativeQuantity(0);
event.setRemainingQuantity(request.getQuantity());
event.setOrderType(request.getOrderType());
event.setLimitPrice(request.getLimitPrice());
event.setStopPrice(request.getStopPrice());
event.setQuantity(request.getQuantity());
event.setMinQuantity(request.getMinQuantity());
event.setDisplayQuantity(request.getDisplayQuantity());
event.setTimeInForce(request.getTimeInForce());
event.setExpireTime(request.getExpireTime());

orderEventHandler.onOrderReplaceEvent(event);
Ember States
Each Ember instance follows simple life cycle shown below.

- Bootstrap state: When server is started it restores state by replaying journal of historical trading transactions.
- Follower state: when High Availability mode is configured a server instance can act as a Follower In this state connectors are on stand by. They receive carbon copy of trading requests and events emitted on Leader node but cannot emit their own messages. It is like Bootstrap state but received messages happen in real time. Trading is not allowed in this state as well.
- Leader: normal run time state in which connector receives real time messages and send trade requests.
- Aborted: ember failed for whatever reason.
Connector should interact with execution venue only in Leader state. In Bootstrap and Follower state connector is responsible for keeping accurate trading state (state of parent and child orders).
The following table shows how trading messages are routed in different modes:
| Mode | Inbound Order Requests | Inbound Order Events | Outbound Order Requests | Outbound Order Events |
|---|---|---|---|---|
| Bootstrap | OMS→Connector | OMS→Connector | OMS→Connector | OMS→Connector |
| Follower | OMS→Connector | OMS→Connector | OMS→Connector | OMS→Connector |
| Leader | OMS→Connector | OMS←Connector | OMS←Connector | OMS←Connector |
Replaying historical trading messages back to connector can be used to restore trading state. For example, trades received during bootstrap can be used to restore your track of current position in each instrument.
Special case must be taken when processing time-sensitive order fields (such as expiration time, for example). We suggest suppressing these checks in Bootstrap mode.
You could override the following callback to react to mode changes:
/** Informs that cluster-related state of this node changed.
Also used to mark transition from initial BOOTSTRAP to LEADER state for single-node installations */
@Override
public void onNodeStatusEvent(NodeStatusEvent event) {
   super.onNodeStatusEvent (event);
   final NodeStatus next = event.getNodeStatus();
   final NodeStatus previous = nodeStatus;

   LOGGER.info("Connector %s switched from %s to %s role")
           .with(name)
           .with(previous)
           .with(next);
}
Session Status
As we explained in Ember State section above connector, once Ember becomes a leader it will actively use trading connectors to communicate with execution venues.
Your connector has responsibility to notify OMS about downstream connection status (e.g. FIX Session or Socket connection to exchange gateway).
The following boilerplate code shows how to report status when your Ember becomes a leader in a cluster or when standalone server exits bootstrap state:
private SessionStatus curentSessionStatus = SessionStatus.DISCONNECTED;

public void onNodeStatusEvent(NodeStatusEvent event) {
   nodeStatus = event.getNodeStatus();

   if (nodeStatus == NodeStatus.LEADER) {
       MutableSessionStatusEvent event = statusEvent;
       event.reuse();
       event.setTimestamp(clock.time());
       event.setStatus(curentSessionStatus);
       event.setSourceId(id);
       sessionEventHandler.onSessionStatusEvent(event);
   }
}
Shutdown Behavior
When system detects a shutdown request (e.g. SIGINT) it notifies all connectors using onShutdownRequest callback. The following boilerplate code simply acknowledges shutdown immediately using ShutdownResponse message:
@Override
public void onShutdownRequest(final ShutdownRequest request) {
   final MutableShutdownResponse response = new MutableShutdownResponse();
   response.setServiceId(id);

   context.getShutdownResponseHandler().onShutdownResponse(response);
}
But in most cases, connector should initiate disconnect from execution venue before acknowledging shutdown. Try to avoid performing any time-consuming actions at shutdown. Each connector has about 15 seconds to respond to shut down request before system proceeds with process termination.
Trading Connectors are not allowed to send any messages to OMS after they had acknowledged shutdown.
Once all services have acknowledged their shutdown system ember process terminates. Default acknowledgement timeout is 15 seconds.
Instrument Metadata
Deltix systems use special TimeBase stream "securities" to keep information about all instruments. Each instrument in this stream may have custom attributes defined for each destination trading venue. For example, vendor-specific symbology or price and size multipliers.
Connectors have access to this stream in the following two ways:
- At creation time connector may access a snapshot of the currently known list of securities via
TradeConnectorContext. - At run time updates about securities are broadcasted via
InstrumentUpdateHandlerset of callbacks that each connector has.
See Appendix B for instructions how to add custom attributes to Security Metadata stream.
Performance Counters
For each service Ember provides low overhead mechanism of publishing and monitoring simple performance counters. Performance Counter is basically INT64 number with a label. Ember monitoring tools can display them via shared memory without disturbing the main message flow with unnecessary internal traffic.
For example, current number of pending REST requests, or a number of reconnect attempts can be exposed via this mechanism.
Trade Connector context provides you Counter Factory as well as predefined connection status counter (1=connected to execution venue; 0=not).
Configuration and Deployment
Configuration Settings
Use connector factory to define connector parameters and configure them at deployment. Here we show how factory defines connection host and port configuration:
public class MarketFactoryTradeConnectorFactory implements TradeConnectorFactory {

    @Required
    private String primaryHost;

    @Required
    private int primaryPort;

    public String getPrimaryHost() {
        return primaryHost;
    }

    public void setPrimaryHost(String primaryHost) {
        this.primaryHost = primaryHost;
    }

    public int getPrimaryPort() {
        return primaryPort;
    }

    public void setPrimaryPort(int primaryPort) {
        this.primaryPort = primaryPort;
    }
    [...]

    @Override
    public MarketFactoryTradeConnector create(final TradeConnectorContext context) {
        return new MarketFactoryTradeConnector(context, primaryHost, ...);
    }
}
If you plan to have multiple instances of connector it is a good idea to define connector template:
template {
    connector {
        mf : ${template.connector.default} {
            factory = "deltix.marketfactory.trade.MarketFactoryTradeConnectorFactory"
            settings {
                primaryHost: "demo.marketfactory.com"
                primaryPort: 3333

                ...
            }
        }
    }
}
Once template is defined in ember-default.conf, adding an instance of connector in ember.conf is straightforward:
connectors {
   MF1 : ${template.connector.mf} {
      settings {
         userId: "frodo"
         password: "my precious"
      }
   }
}
General idea is to keep instance-specific parameters in ember.conf.
Note that this instance is deployed under Source ID MF1.
Deployment
Add connector library JAR to Ember runtime CLASSPATH. One way of doing it is placing a library with compiled connector and supporting it classes under lib/custom folder of Ember installation. All JAR files found in this folder are automatically added to Java CLASSPATH by Ember startup scripts.
Custom Docker image
When Ember is used in Deltix CryptoCortex product there is a special docker container called “emberpack” that contains ember itself and library of standard connectors. You can extend this library with your custom connector:
Our sample package provides an example of docker generation for sub-project marketfactory. Dockerfile sample:
FROM https://nexus.deltixhub.com/deltix.docker/anvil/deltix-ember-pack:1.6.3
COPY custom /opt/deltix/ember/lib/custom
Gradle project for marketfactory sample connector shows how to build docker image. The script relies on the following environment variables that define credentials to access Deltix docker repository:
./gradlew :marketfactory:dockerBuildImage -PdebugDockerBuild=true
Next Steps
Deltix provides source code of one FIX and one REST trading connector as examples. TODO: Links to github
Crypto Connector Requirements
This section contains some notes related development of new crypto connector framework.
Cancel requests
What the connector should do if it gets cancel request for UNACKNOWLEDGED order?
If exchange supports cancel by clientOrderId then we should use it to execute cancel. Otherwise, we must reject the request. We don't need to do delayed cancel requests.
Appendix A: Debugging trade connector
One simple way to debug your connector is running entire Ember under debugger. Look at EmberApp run configuration inside IntelliJ/IDEA project that was provided to you as a sample. TODO: Link
This run configuration uses deltix.ember.app.EmberApp as a main class and ember.home system property that point to ember configuration home. Project includes sample ember.conf in /home directory.
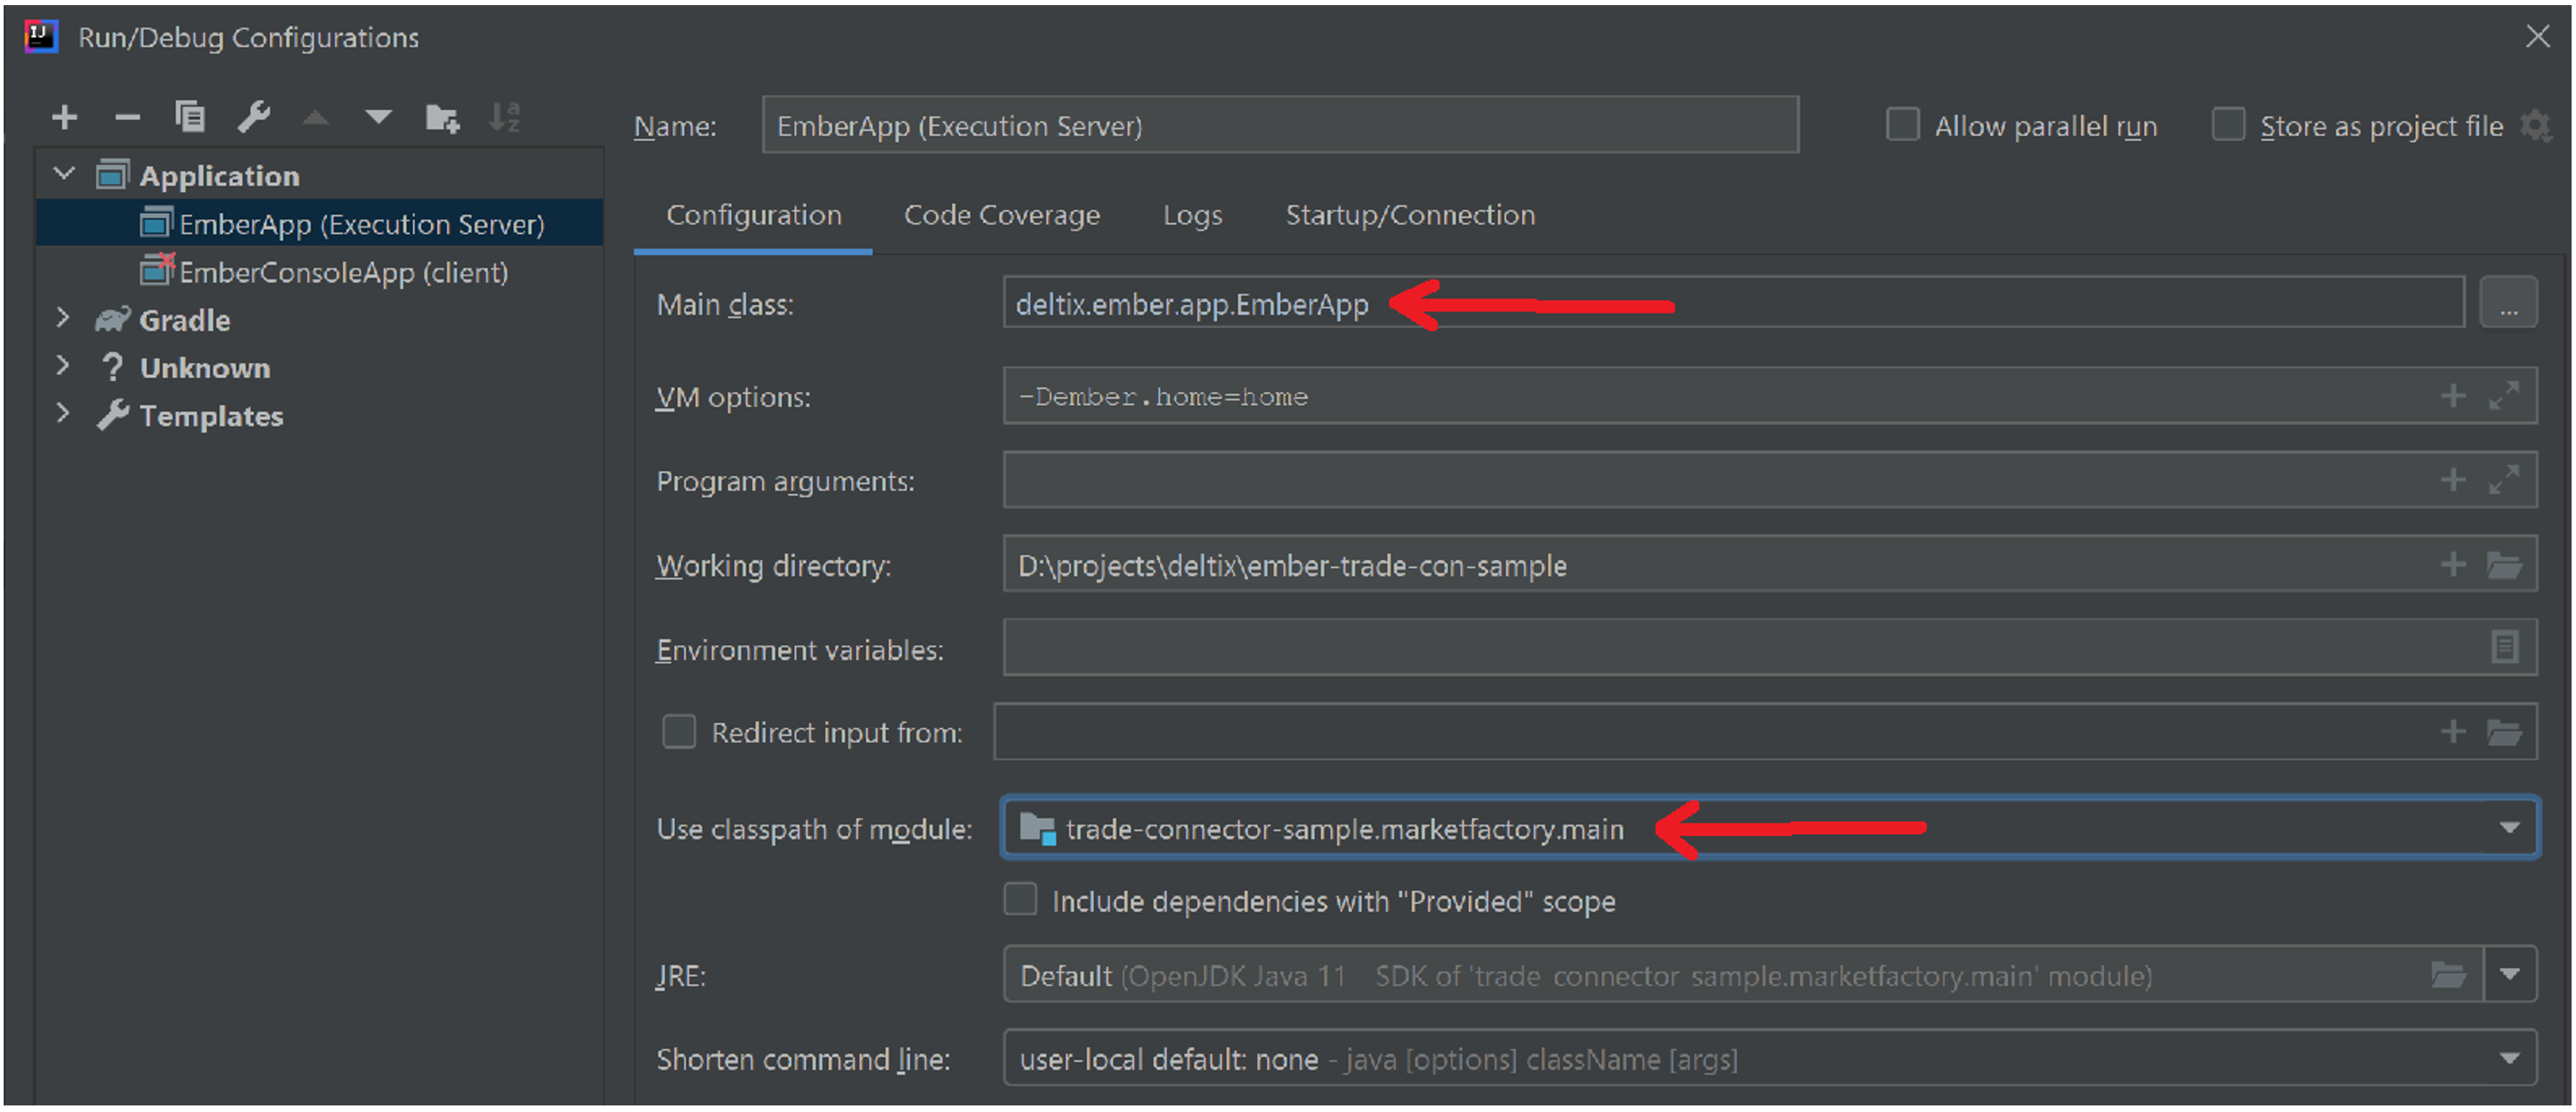
You can setup breakpoints in your connector and launch EmperApp under debugger.
You will need to have TimeBase running to run Ember. See Quick Start document for more information.
You can also use EmberConsoleApp run configuration to launch simple CLI tool that can be used to generate test orders:
==> set symbol BTC/USD
==> set destinationId MF
==> set side BUY
==> set quantity 1
==> submit
{"$type":"OrderNewRequest","timeInForce":"DAY","orderId":"1606769998881","side":"BUY","quantity":1,"orderType":"MARKET", "exchangeId":"FILL","flags":0,"symbol":"BTC/USD","instrumentType":"FX", "sourceId":"TRADER-CLI", "destinationId":"MF"}
Submit the new order request? (y/n): y
New order request was sent TRADER-CLI:1606769998881
==> Message received:
{"$type":"OrderRejectEvent","reason":"Not connected","orderId":"1606769998881","correlationOrderId":"1606769998881","orderStatus":"REJECTED","eventId":"1606769952096","side":"BUY","quantity":1,"orderType":"MARKET", "exchangeId":"FILL","cumulativeQuantity":0,"averagePrice":0,"remainingQuantity":0,"timeInForce":"DAY","sequence":3,"symbol":"BTC/USD","instrumentType":"FX","timestamp":"2020-11-30T21:00:00.633Z", "sourceId":"MF", "destinationId":"TRADER-CLI"}
See Ember Console documentation for full description of this tool.
Appendix B: How to add custom column to security metadata
You will need TimeBase Admin GUI.
- Launch TimeBase Admin GUI (Java version).
- Select "securities" stream, right click, and select "Edit schema..." from a popup menu.
- On the left side panel select message type you want to modify, for example "deltix.timebase.api.messages.securities.Currency".
- To add additional field to the selected message use right side panel. Click on "New non-static" button (it creates new non-static field).
- Enter field name and type. For example, name="customField", type=VARCHAR.
- When done click “Next”. System will ask for default value to be used for existing stream data. You can skip it and click “Save”.
- Now select the stream, right click, and select "Edit" from a popup menu. You should be able to enter values for new field. Hit Apply button on the toolbar to save changes.
