index
Setting up Authentication and Single Sign-On
Starting from Ember version 1.15, authentication and authorization configuration has changed. Please refer to the Ember 1.15+ configuration section for the updated configuration approach.
Ember Monitor uses OAuth2 authentication via a Spring server that runs inside the Ember Monitor backend by default.
Starting from version 1.6.51, Ember Monitor supports authentication via “external” OAuth2 authentication providers, such as Hydra, Auth0, Gluu, etc. Different authentication providers can require different settings, but the minimum set of required settings for any authentication provider are:
spring:
  security:
    oauth2:
      resourceserver:
        jwt:
          issuer-uri: https://example.com

security:
  oauth2:
    provider:
      custom: false
      clientId: ember_monitor
custom flag is set to false means that an “external” authentication provider is used (by default, it is set to true).
General Ideas
The provider needs to be configured with an issuer-uri, which asserts an Issuer Identifier.
The clientId is an identifier of the application in the authentication provider.
Most settings can be discovered automatically by Ember Monitor (like jwksUrl, configUrl, logoutUrl, userInfoUrl) using issuer-uri, but you can override them manually.
Auth0 OAuth
Starting from Ember version 1.15, authentication and authorization configuration has changed. Please refer to the Ember 1.15+ configuration section for the updated configuration approach.
Here is a minimal settings example for Auth0:
spring:
 security:
  oauth2:
   resourceserver:
    jwt:
     issuer-uri: https://cryptocortex.auth0.com/

security:
 oauth2:
  provider:
   custom: false
   name: auth0
   clientId: XxObbM1ttgb5MpS48l7upTV5L8BlX4X7yN
   audience: XxObbM1ttgb5MpS48l7upTV5L8BlX4X7yN
   configUrl: https://cryptocortex.auth0.com/.well-known/openid-configuration
   logoutUrl: https://cryptocortex.auth0.com/logout
   validateIssuer: true
   userInfo:
    enable: true
A few notes for Auth0:
- Make sure you specify
logoutUrlandaudience. secretis not needed.clientIdis the same as resource id.
KeyCloak OAuth
Starting from Ember version 1.15, authentication and authorization configuration has changed. Please refer to the Ember 1.15+ configuration section for the updated configuration approach.
Here is a minimal settings example for Keycloak:
spring:
 security:
  oauth2:
   resourceserver:
    jwt:
     issuer-uri: https://host:1111/auth/realms/myrealm

security:
 oauth2:
  provider:
   custom: false
   name: keycloak
   clientId: ember_monitor
   usernameClaim: preferred_username
   validateIssuer: false
Azure AD (Entra ID) OAuth
Starting from Ember version 1.15, authentication and authorization configuration has changed. Please refer to the Ember 1.15+ configuration section for the updated configuration approach.
Here is a minimal settings example for Azure AD (Entra ID):
spring:
  security:
    oauth2:
      resourceserver:
        jwt:
          issuer-uri: https://login.microsoftonline.com/b41b72d0-4e9f-4c26-8a69-f949f367c92d/v2.0 # from Overview -> Endpoints page of the application

security:
  oauth2:
    provider:
      custom: false
      name: azure
      clientId: b1af1d9c-e2b9-4fa5-a66a-7df098653078 # from the Overview page of the application
      usernameClaim: upn
      validateIssuer: false
      scopes:
        - openid
        - profile
        - api://8f5a9e26-de50-4d00-aa21-653c29b17624/app # from p. 4.2 of Azure AD application configuration, see below
Azure AD (Entra ID) application registration
Follow these steps to create and configure an application in Azure AD (Entra ID):
- Open Azure Portal.
- Find
App registrationsservice. - Choose
New registration:- Register a new application with
Name(e.g.EMBER_MONITOR). - Navigate to
Certificates & secretsfor the created application and create anew client secret. We suggest saving it, because you will not be able to view it after it is created! - Navigate to
Expose an APIfor the created application and add anApplication ID URI. Add a new scopeon the same page (e.g., with the nameappand display nameappand any description) and setWho can consent?-Admins and users. The scope must be in the Enabled state.- Go to
Manifest, findappsection in JSON file and set value ofrequestedAccessTokenVersionto2. - To assign roles for users follow this guide.
- Navigate to
App rolesand create a new role (e.g.HALT_RESUME_TRADING) and assign it to theUsers/Groupsmember types. - Go to
Enterprise apps, find your application. - Select
Users and groupstab and clickAdd user/groupbutton. - Select a user and assign a role created in p. 3.6.1 to this user.
- Navigate to
- Register a new application with
- Return to
App registrationsand useNew registrationagain:- Create the second application with a
Name(e.g.EMBER_MONITOR_APP) withRedirect URIfor theSPA. - Navigate to
Authenticationpage for created application and add newRedirect URIif you need. An example ofRedirect URIlist for localhost setup: http://localhost:8988/assets/sign-in.html http://localhost:8988/assets/silent-auth.html - Navigate to
API permissionsand clickAdd a permission. Then, select theMy APIstab and select the application from p. 3.1 (EMBER_MONITOR). Find scope we created in p. 3.4 (app), choose it and clickAdd permission.
- Create the second application with a
- Navigate to
Overviewand select theEndpointstab. The endpoints from this tab will be used to configureEmber MonitorwithAzure AD.
AWS Cognito OAuth
Starting from Ember version 1.15, authentication and authorization configuration has changed. Please refer to the Ember 1.15+ configuration section for the updated configuration approach.
Here is a minimal settings example for Amazon Cognito:
spring:
 security:
  oauth2:
   resourceserver:
    jwt:
     issuer-uri: https://cognito-idp.us-east-2.amazonaws.com/us-east-2_b45Ex9azg

security:
  oauth2:
    provider:
      custom: false
      name: cognito
      configUrl: https://cognito-idp.us-east-2.amazonaws.com/us-east-2_b45Ex9azg/.well-known/openid-configuration
      clientId: 6imeu3v09bvri6o4uenka9dv9b
      audience: 6imeu3v09bvri6o4uenka9dv9b
      logoutUrl: https://ember-test.auth.us-east-2.amazoncognito.com/logout
      usernameClaim: username
      validateIssuer: true
For Cognito, the issuer-uri has the following format:
https://cognito-idp.{region}.amazonaws.com/{userPoolId}
For example, suppose you created a user pool in the us-east-2 region and its user pool ID is us-east-2_b45Ex9azg. In that case, the ID token issued for users of your user pool has the following iss claim value:
https://cognito-idp.us-east-2.amazonaws.com/us-east-2_b45Ex9azg
For Cognito, the logout-url uses the domain that you specified in User Pool > Domain settings:
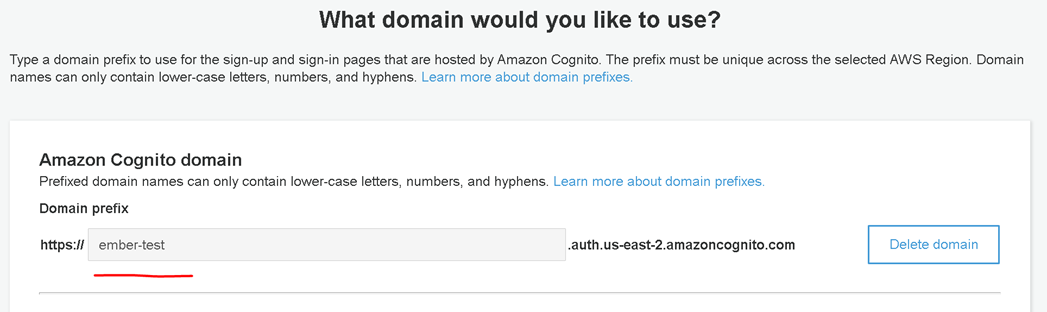
Make sure to edit app client settings in the Cognito console.
You need to enter two URLs for Callback URLs (/assets/sign-in.html and /assets/silent-auth.html) and one URL for Sign Out URLs (/assets/sign-in.html). These two sub paths are hardcoded in the frontend.
In our case, they are (case-sensitive):
- Callback URL(s):
https://ember.deltixuat.com/assets/sign-in.html, https://ember.deltixuat.com/assets/silent-auth.html - Sign out URL(s):
https://ember.deltixuat.com/assets/sign-in.html
Setting up Authorization
Ember Monitor uses the QuantServer 4.3 User Access Control (UAC) approach shared with TimeBase.
There are three options to define user permissions:
- User database is kept in a simple configuration file.
- User database is kept in LDAP (or ActiveDirectory).
- User roles are configured on OAuth2 authentication provider.
Please read the QuantServer UAC Configuration Guide for more information about the first two options.
The following steps briefly describe how to configure it:
Create two files under Ember’s home directory:
Make sure to add these settings to application.yaml:
security:
  oauth2:
    authenticationType: SIMPLE # valid options: NONE, SIMPLE, LDAP, PROVIDER
Reload Interval
To set up authentication reload interval, use the following:
security:
  oauth2:
    authenticationReloadInterval: 1I
This property means that Ember Monitor will load authentication configuration file in set interval. So you can change user permissions and groups without restarting the application.
Examples of different time intervals:
- 1D: 1 day
- 2H: 2 hours
- 3I: 3 minutes
- 10S: 10 seconds
For the third Oauth2 provider JWT authorization option, follow these steps:
- Create OAuth2 provider roles with the names matching Ember Monitor permissions:
   HALT_RESUME_TRADING,
   CHANGE_RISK_LIMITS,
   ORDER_ENTRY,
   POSITION_ADJUSTMENT,
   ORDER_CANCEL,
   ENABLE_DISABLE_SERVICE,
   CONTROL_FIX_SESSION,
   CHANGE_INSTRUMENT_PRICES
Grant the necessary roles to the Ember users.
- Set
authenticationTypetoPROVIDERin application.yaml:
security:
  oauth2:
    authenticationType: PROVIDER # valid options: NONE, SIMPLE, LDAP, PROVIDER
- In application.yaml add the
authoritiesClaimattribute to OAuth2 provider configuration. This attribute value must contain '.' separated path to the roles in JWT token issued by this provider. For instance for Keycloak provider JWT authorization configuration would look like this:
security:
  oauth2:
    authenticationType: PROVIDER
    provider:
      custom: false
      name: keycloak
      clientId: ember_monitor
      usernameClaim: preferred_username
      validateIssuer: false
      authoritiesClaim: realm_access.roles