Ember Monitor Configuration Guide
Overview
Ember Monitor is a GUI application that provides dashboard/administrative capabilities to Ember.
Ember Monitor is based on a Spring Boot-based backend, so configuration can be extended (or overridden) in many ways:
- A configuration file (yaml)
- Java system properties
- Environment variables
- Command line properties
All examples described below use the application.yaml file configuration, but any of the above ways can be used.
Adding a Configuration File
To extend (and override) Ember Monitor settings, create application.yaml, for example, in the Ember home directory, and specify the location to it through an environment variable:
set EMBER_MONITOR_OPTS=-Dspring.config.additional-location=/deltix/emberhome/application.yaml
Changing Ember Monitor Port
To change the port number of Ember Monitor, add the following to application.yaml:
server:
  port: 8992
Enabling HTTPS
To enable HTTPS:
- Create a keystore with a valid key pair. Here we generate a self-signed certificate using JDK’s keytool:
keytool -genkey -keyalg RSA -alias esmonitor -keystore selfsigned.jks -validity 1000 -keysize 2048
- Add the following settings to application.yaml:
server:
  ssl:
    key-store: /deltix/emberhome/selfsigned.jks
    key-store-password: password
    keyStoreType: JKS
    keyAlias: esmonitor
Ember Monitor uses the Spring Boot framework. You can use Spring parameters to adjust web settings.
For example, to require TLS 1.2:
# SSL protocol to use
server.ssl.protocol=TLS

# Enabled SSL protocols
server.ssl.enabled-protocols=TLSv1.2
Number Formatting Precision
converters:
  decimalPricePrecision: 5
  decimalQuantityPrecision: 3
Setting up Authentication and Single Sign-On
Ember Monitor uses OAuth2 authentication via a Spring server that runs inside the Ember Monitor backend by default.
Starting from version 1.6.51, Ember Monitor supports authentication via “external” OAuth2 authentication providers, such as Hydra, Auth0, Gluu, etc. Different authentication providers can require different settings, but the minimum set of required settings for any authentication provider are:
spring:
  security:
    oauth2:
      resourceserver:
        jwt:
          issuer-uri: https://example.com

security:
  oauth2:
    provider:
      custom: false
      clientId: ember_monitor
In this case, the custom flag means that an “external” authentication provider is used (by default, it is set to true).
Reload Interval
To reload an interval, use the following:
security:
  oauth2:
    authenticationReloadInterval: 1I
Examples of different time intervals:
- 1D: 1 day
- 2H: 2 hours
- 3I: 3 minutes
- 10S: 10 seconds
General Ideas
The provider needs to be configured with an issuer-uri, which asserts an Issuer Identifier.
The clientId must be registered in the authentication provider.
Most settings can be discovered automatically by Ember Monitor (like jwksUrl, configUrl, logoutUrl, userInfoUrl) using issuer-uri, but you can override them manually.
Hydra OAUTH
Here is a minimal settings example for Hydra in the CryptoCortex setup:
spring:
  security:
    oauth2:
      resourceserver:
        jwt:
          issuer-uri: https://hydra-config.dev.deltixhub.io/

security:
  oauth2:
    provider:
      custom: false
      name: hydra
      clientId: ember_monitor
      validateIssuer: false
      userInfo:
        enable: true
The frontend uses the name field to distinguish authentication providers. In the CryptoCortex setup, we should not validate issuers on the backend, so we specify a validateIssuer option.
For resolving usernames, use UserInfo.enable (because hydra can’t send username in token).
The full configuration setup looks like:
spring:
  security:
    oauth2:
      resourceserver:
        jwt:
          issuer-uri: https://hydra-config.dev.deltixhub.io/

security:
  oauth2:
    authenticationType: SIMPLE # valid options: NONE, SIMPLE, LDAP
    provider:
      custom: false
      name: hydra
      jwksUrl: https://hydra-config.dev.deltixhub.io/.well-known/jwks.json
      configUrl: https://hydra-config.dev.deltixhub.io/.well-known/openid-configuration
      clientId: ember_monitor
      audience: audience
      logoutUrl: https://hydra-config.dev.deltixhub.io/oauth2/sessions/logout
      usernameClaim:
      validateIssuer: false
      userInfo:
        enable: true
        userInfoUrl: https://hydra-config.dev.deltixhub.io/userinfo
        userNameKey: name
Auth0 OAuth
Here is a minimal settings example for Auth0:
spring:
 security:
  oauth2:
   resourceserver:
    jwt:
     issuer-uri: https://cryptocortex.auth0.com/

security:
 oauth2:
  provider:
   custom: false
   name: auth0
   clientId: XxObbM1ttgb5MpS48l7upTV5L8BlX4X7yN
   audience: XxObbM1ttgb5MpS48l7upTV5L8BlX4X7yN
   configUrl: https://cryptocortex.auth0.com/.well-known/openid-configuration
   logoutUrl: https://cryptocortex.auth0.com/logout
   validateIssuer: true
   userInfo:
    enable: true
A few notes for Auth0:
- Make sure you specify
logoutUrlandaudience. secretis not needed.clientIdis the same as resource id.
KeyCloak OAuth
Here is a minimal settings example for Keycloak:
spring:
 security:
  oauth2:
   resourceserver:
    jwt:
     issuer-uri: https://host:1111/auth/realms/myrealm

security:
 oauth2:
  provider:
   custom: false
   name: keycloak
   clientId: ember_monitor
   usernameClaim: preferred_username
   validateIssuer: false
Azure AD (Entra ID) OAuth
Here is a minimal settings example for Azure AD (Entra ID):
spring:
  security:
    oauth2:
      resourceserver:
        jwt:
          issuer-uri: https://login.microsoftonline.com/b41b72d0-4e9f-4c26-8a69-f949f367c92d/v2.0 # from Overview -> Endpoints page of the application

security:
  oauth2:
    provider:
      custom: false
      name: azure
      clientId: b1af1d9c-e2b9-4fa5-a66a-7df098653078 # from the Overview page of the application
      usernameClaim: upn
      validateIssuer: false
      scopes:
        - openid
        - profile
        - api://8f5a9e26-de50-4d00-aa21-653c29b17624/app # from p. 4.2 of Azure AD application configuration, see below
Azure AD (Entra ID) application registration
Follow these steps to create and configure an application in Azure AD (Entra ID):
- Open Azure Portal.
- Find
App registrationsservice. - Choose
New registration:- Register a new application with
Name(e.g.EMBER_MONITOR). Use default settings without Redirect URI. - Navigate to
Certificates & secretsfor the created application and create anew client secret. We suggest saving it, because you will not be able to view it after it is created! - Navigate to
Expose an APIfor the created application and add anApplication ID URI. Add a new scopeon the same page (e.g., with the nameappand display nameappand any description) and setWho can consent?-Admins and users. The scope must be in the Enabled state.
- Register a new application with
- Return to
App registrationsand useNew registrationagain:- Create the second application with a
Name(e.g.EMBER_MONITOR_APP) withRedirect URIfor theSPA. - Navigate to
Authenticationpage for created application and add newRedirect URIif you need. An example ofRedirect URIlist for localhost setup: http://localhost:8988/assets/sign-in.html http://localhost:8988/assets/silent-auth.html - Navigate to
API permissionsand clickAdd a permission. Then, select theMy APIstab and select the application from p. 3.1 (EMBER_MONITOR). Find scope we created in p. 3.4 (app), choose it and clickAdd permission.
- Create the second application with a
- Navigate to
Overviewand select theEndpointstab. The endpoints from this tab will be used to configureEmber MonitorwithAzure AD.
AWS Cognito OAuth
Here is a minimal settings example for Amazon Cognito:
spring:
 security:
  oauth2:
   resourceserver:
    jwt:
     issuer-uri: https://cognito-idp.us-east-2.amazonaws.com/us-east-2_b45Ex9azg

security:
  oauth2:
    provider:
      custom: false
      name: cognito
      configUrl: https://cognito-idp.us-east-2.amazonaws.com/us-east-2_b45Ex9azg/.well-known/openid-configuration
      clientId: 6imeu3v09bvri6o4uenka9dv9b
      audience: 6imeu3v09bvri6o4uenka9dv9b
      logoutUrl: https://ember-test.auth.us-east-2.amazoncognito.com/logout
      usernameClaim: username
      validateIssuer: true
For Cognito, the issuer-uri has the following format:
https://cognito-idp.{region}.amazonaws.com/{userPoolId}
For example, suppose you created a user pool in the us-east-2 region and its user pool ID is us-east-2_b45Ex9azg. In that case, the ID token issued for users of your user pool has the following iss claim value:
https://cognito-idp.us-east-2.amazonaws.com/us-east-2_b45Ex9azg
For Cognito, the logout-url uses the domain that you specified in User Pool > Domain settings:
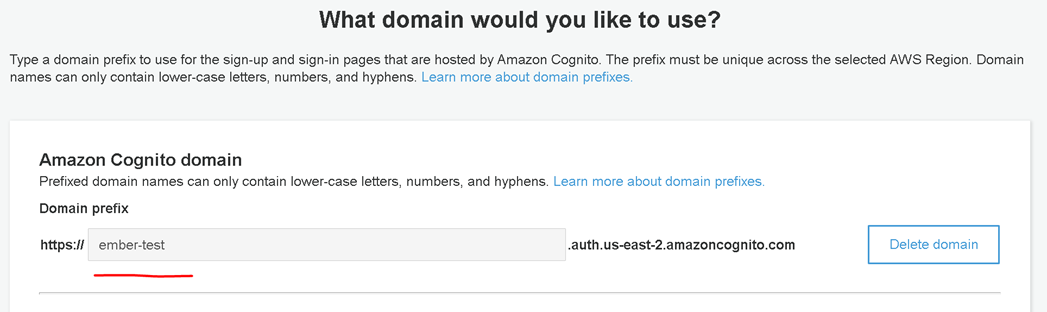
Make sure to edit app client settings in the Cognito console.
You need to enter two URLs for Callback URLs (/assets/sign-in.html and /assets/silent-auth.html) and one URL for Sign Out URLs (/assets/sign-in.html). These two sub paths are hardcoded in the frontend.
In our case, they are (case-sensitive):
- Callback URL(s):
https://ember.deltixuat.com/assets/sign-in.html, https://ember.deltixuat.com/assets/silent-auth.html - Sign out URL(s):
https://ember.deltixuat.com/assets/sign-in.html
Setting up Authorization
Ember Monitor uses the QuantServer 4.3 User Access Control (UAC) approach shared with TimeBase.
There are three options to define user permissions:
- User database is kept in a simple configuration file.
- User database is kept in LDAP (or ActiveDirectory).
- User roles are configured on OAuth2 authentication provider.
Please read the QuantServer UAC Configuration Guide for more information about the first two options.
The following steps briefly describe how to configure it:
- Create two files under Ember’s home directory:
- Make sure to add these settings to application.yaml:
security:
  oauth2:
    authenticationType: SIMPLE # valid options: NONE, SIMPLE, LDAP, PROVIDER
For the third Oauth2 provider JWT authorization option, follow these steps:
- Create OAuth2 provider roles with the names matching Ember Monitor permissions:
   HALT_RESUME_TRADING,
   CHANGE_RISK_LIMITS,
   ORDER_ENTRY,
   POSITION_ADJUSTMENT,
   ORDER_CANCEL,
   ENABLE_DISABLE_SERVICE,
   CONTROL_FIX_SESSION,
   CHANGE_INSTRUMENT_PRICES
Grant the necessary roles to the Ember users.
- Set
authenticationTypetoPROVIDERin application.yaml:
security:
  oauth2:
    authenticationType: PROVIDER # valid options: NONE, SIMPLE, LDAP, PROVIDER
- In application.yaml add the
authoritiesClaimattribute to OAuth2 provider configuration. This attribute value must contain '.' separated path to the roles in JWT token issued by this provider. For instance for Keycloak provider JWT authorization configuration would look like this:
security:
  oauth2:
    provider:
      authenticationType: PROVIDER
      custom: false
      name: keycloak
      clientId: ember_monitor
      usernameClaim: preferred_username
      validateIssuer: false
      authoritiesClaim: realm_access.roles
Storing configuration secrets
Since 1.14.177 Ember Monitor supports storing sensitive information in secure vaults like Azure Key Vault or Hashicorp Vault.
To do that the vault needs to be configured as a property source in application.yaml file.
After that any sensitive configuration property in application.yaml can be replaced with a reference to the corresponding vault secret.
Example of Azure Key Vault property source configuration (all available properties):
spring:
  cloud:
    azure:
      keyvault:
        secret:
          property-sources[0]:
            endpoint: "https://<vault-name>.vault.azure.net/"
In addition to Vault URL, you'll need to specify client ID, client secret (Azure application ID and secret)
and tenant ID (Azure Directory ID). You can do it by setting these environment variables: AZURE_CLIENT_ID, AZURE_CLIENT_SECRET, AZURE_TENANT_ID.
Use placeholder values to reference Azure Key Vault secrets in application.yaml:
security:
  oauth2:
    secret: ${ember_oauth2_secret} # where ember_oauth2_secret is the name of the corresponding Vault secret
Example of Hashicorp vault data source config (see Spring Cloud Vault documentation for details):
spring:
  config:
    import: vault:// # path to application secrets, supports multiple paths (e.g. "vault://secret/web_admin, vault://my-secrets/my/secret")
  cloud:
    vault:
      fail-fast: true # <true|false>
      uri: http://localhost:8200
      token: secret # token
      authentication: TOKEN
      kv:
        backend: <my-secret> # engine path, default is `secret`
        application-name: <path/to/secret> # application path, default is `application`
Trading Server Connection and Traders Mapping Service
Deltix CryptoCortex internally uses surrogate identifiers for users and user groups (traders and trade groups). These identifiers resemble long hexadecimal numbers (GUIDs). You can configure the ES Monitor to display traders and groups using their human-readable names. Note that for large deployments that host multiple organizations, trader and group names may not be unique. Follow the steps described below.
These instructions apply to authentication providers that support password flow:
- Hydra
- Auth0
- Gluu
- AWS Cognito
Add the following block to application.yaml. Be sure to change the highlighted fields to match your environment.
Also, notice that, (as in most other places), secrets are encrypted (which is indicated by the EV prefix). Use Ember’s mangle utility to encrypt raw passwords.
# Use ‘trader-name-resolver’ settings to switch on trader's mapping service

trader-name-resolver:
  enabled: true
  allowUnknown: false # prevent orders and positions for unknown traders
  cacheClearInterval: 1H # rest query caches expire interval

# Fill only ‘trading-server.apiKey’ group if you want to connect DTS using api key,
# or fill only ‘trading-server.auth’ group if you want to connect via password flow.

trading-server:
  url: http://10.10.81.80:1988 # DTS REST API URL
  apiKey:
    apiKeyId: CB424F5E-E36B-4B00-A7BE-B50A1E0EF762
    privateKey: MIIEvQIBADANBgkqhkiG9w0BAQEFAASCBKcwg...
  auth:
    loginUrl: https://cryptocortex.auth0.com/oauth/token
    operatorLogin: OperatorLogin
    operatorPassword: EVcae6d04e281b92d12d0670b0f62c20f9
    authMethod: Bearer
    clientId: fB9USTGohUmwLACKPuddwefwefLsr5BNiQ
    clientSecret: EVb3a37a99c9ecec495d2aeb6b16bf9d39266f30b753fcb970d
    audience: fB9USTGohUmwLACKPuddwefwefLsr5BNiQ
This is YAML format. Be careful with indents (e.g., the trading-name-resolver block must appear at root level).
How To Get DTS API Key
To generate a DTS API key in the C2 Configurator:
- Go to Settings > API Keys.
- Click Create.
- Set up your DTS API key.

Custom Features
In some cases, Ember Monitor may contain a custom functionality to support specific client needs. This is usually configured using the custom/features configuration section.
Here is an example:
custom:
  features:
    - name: pfe
      settings:
         risk:
           baseUrl: http://localhost:8888
         exposure:
           baseUrl: http://localhost:8888
           foo: bar
    - name: anotherFeature
      settings:
         anotherName: another_value
Order Book Panel
When Ember hosts an order matching engine, it may be useful to monitor the state of order book.
To enable monitoring, add the following to application.yaml to enable clob feature and configure order book data:
custom:
  features:
    - name: clob
      settings:
        dashboard:
          title: Order Book
          menuIndex: 8

orderbook:
  algorithms: ["MATCHER"]
  marketDataStreams: ["matcher_feed_stream"]
  orderDestinations: [ "MATCHER" ]
Where:
algorithms- the list of Ember algorithms publishing market data about their ordersmarketDataStreams- L2 level market data streams to include in order booksorderDestinations- monitor orders issued to these destinations on the Order Book tab
The order book panel allows a per-instrument trading halt and requires a per-Symbol risk projection defined in ember.conf. (See the Risk and Positions Tutorial document for more information):
risk {
  riskTables: {
     Symbol:[]
  }
}
Expose Metrics to Prometheus Server
By default, Ember Monitor enables the /actuator/prometheus endpoint, which exposes metrics from all Ember performance counters.
The prometheus endpoint is enabled in this section in application.yaml along with the health endpoint:
management:
  endpoint:
    prometheus:
      enabled: true
    health:
      enabled: true

  endpoints:
    enabled-by-default: false
    web:
      exposure:
        include: prometheus,health
Basic Authentication
When Ember Monitor has UAC users configured, the /actuator/prometheus endpoint can be accessed with basic authentication.
Here is an example of Prometheus job configuration for scraping Ember metrics using basic authentication:
- job_name: 'ember'
  metrics_path: '/actuator/prometheus'
  scrape_interval: 5s
  static_configs:
  - targets: ['<ember_monitor_host>:8988']
  basic_auth:
     username: <ember_monitor_user>
     password: <ember_monitor_password>
OAuth2 Authentication
When Ember Monitor is configured to use an external OAuth2 provider (security.oauth2.provider.custom=false in application.yaml),
the /actuator/prometheus endpoint can be accessed with OAuth2 authentication. OAuth2 is required when Monitor is using PROVIDER authentication mode (security.oauth2.authenticationType=PROVIDER).
Here is an example of Prometheus job configuration for scraping Ember metrics using OAuth2:
- job_name: "ember"
  metrics_path: '/actuator/prometheus'
  scheme: http
  static_configs:
    - targets: ['<ember_monitor_host>:8988']
  oauth2:
    client_id: <client-id>
    client_secret: <client-secret>
    token_url: <authentication_provider_token_endpoint_url>
    scopes:
      - metrics
By default, Ember requires any OAuth2 client accessing /actuator/prometheus endpoint to be granted the "metrics" scope.
The required scope can be changed using the following attribute in application.yaml:
security.oauth2.provider.metricsScope=<scope_name>
Setting the scope to null would disable scope validation for the prometheus endpoint.
Displaying Exchange Balances in ES Monitor
If you want to see “theoretical” balances (or positions), you must configure your system as described in the Risk and Positions Tutorial document. This document assumes you are familiar with the notion of Position Projections described there.
This section explains how to see an “actual” position (AKA “balance”) provided by execution venues.
Please bear in mind that:
- Not all exchanges have APIs to retrieve the current position size.
- Even when exchanges do provide an API for that, retrieving information becomes available with some delay (usually measured in a few seconds). However, under some abnormal conditions (e.g., API gateway is down, or hit throttling limits) there may be a considerable delay.
- Multiple trading accounts are not yet supported. A workaround is to configure multiple instances of trading connector for each account.
Configuration
To access Execution Venues, users can use trading connectors - specialized components that adapt the trade message flow to the API of specific exchanges. To configure these connectors, connection parameters such as trading credentials and API access keys are typically required. These parameters can be specified in the Ember configuration file, where each connector is assigned a unique identifier known as a Destination ID.
For example, the following commands define KRAKEN as the destination to the Kraken trading connector.
connectors {
  KRAKEN : ${template.connector.legacy.crypto.kraken} {
    settings : {
        apiKey = "Key1"
        apiSecret = "Secret1"
        ….
    }
  }
  ...
}
We recommend using connector descriptors that match the Deltix Exchange Identifier.
To view exchange balances, make sure you have the Destination/Currency projection defined in your Ember configuration (ember.conf).
The configuration fragment should look like this:
risk {
  riskTables: {
    ...
    Destination/Currency: [MaxOrderSize,MaxPositionLong,MaxPositionShort]
  }
  allowUndefined: [ Account, Exchange, Trader]
}
Troubleshooting
Balances are missing from the GUI:
- Make sure you configure a Destination/Currency projection and select it in the GUI.
The Balances column is always empty or balances from some exchanges are missing:
- Make sure you have a trading connector for the desired exchange configured.
- Verify that the connector is publishing regular updates into the TimeBase balances stream. Use the TimeBase Monitor or TimeBase Administrator GUIs.
Appendix A: Example of Simple Security Files
This section describes how to configure a simple file-based User Access Control in Ember Monitor.
application.yaml
To configure an authentication type as SIMPLE, run Ember Monitor with the -Dsecurity.oauth2.authenticationType=SIMPLE option, or add the following entry to $EMBER_HOME/application.yaml:
security:
  oauth2:
    authenticationType: SIMPLE
uac-file-security.xml
The file $EMBER_HOME/uac-file-security.xml defines users and user groups:
<?xml version="1.0" encoding="UTF-8" standalone="yes"?>
<config xmlns="http://xml.deltixlab.com/internal/quantserver/3.0">
    <users>
        <user id="admin">
            <password>EV872314EHC12BE</password> <!-- encrypted -->
        </user>
        <user id="trader">
            <password>EV872314EHC12BE</password> <!-- encrypted -->
        </user>
    </users>
    <groups>
        <group id="Administrators">
            <principal>admin</principal>
        </group>
        <group id="Traders">
            <principal>trader</principal>
        </group>
    </groups>
</config>
uac-access-rules.xml
The file $EMBER_HOME/uac-access-rules.xml defines what permissions users or groups my have. By default, users or groups have no permissions (read-only access):
<?xml version="1.0" encoding="UTF-8" standalone="yes"?>
<rules xmlns="http://xml.deltixlab.com/internal/quantserver/3.0">
    <allow>
        <principal>Administrators</principal>
        <permission>*</permission>
        <resource>*</resource>
    </allow>
    <allow>
        <principal>Traders</principal>
        <permission>HALT_RESUME_TRADING</permission>
    </allow>
</rules>
Ember Monitor supports the following per-user permissions:
HALT_RESUME_TRADING– Allows halt/resume trading on an entire server (kill switch).CHANGE_RISK_LIMITS– Allows changing risk limits (e.g., max order size for some trader).ORDER_ENTRY– Allows entering a new trade order.ORDER_CANCEL– Allows canceling any order.POSITION_ADJUSTMENT– Allows adjusting positions in any projection.ENABLE_DISABLE_SERVICE– Enables/disables an Ember service (connector, algorithm, etc.).CONTROL_FIX_SESSION– Enables/Disables the FIX Gateway client, disconnects the FIX Gateway client, and resets sequence numbers.
Appendix B: Example of LDAP configuration
Here is a sample of LDAP(AD) based configuration.
Remember to select the LDAP authentication type in your application.yml file, as described previously.
Store this configuration in the EMBER_HOME/uac-ldap-security.xml file:
<?xml version="1.0" encoding="UTF-8" standalone="yes"?>
<config xmlns="http://xml.deltixlab.com/internal/quantserver/3.0">
    <connection>ldap://localhost:10389</connection>
    <connection>ldap://localhost:10390</connection>
    <credentials>
        <username>uid=admin,ou=system</username>
        <key>a29119d05e203c1b</key>
    </credentials>
    <groups filter="(objectClass=groupOfUniqueNames)" node="ou=groups,dc=deltix,dc=com"/>
    <user>
        <objectClass>person</objectClass>
        <objectClass>organizationalPerson</objectClass>
        <objectClass>inetOrgPerson</objectClass>
        <attribute field="id" name="cn"/>
        <attribute property="setName" name="cn"/>
        <attribute property="setDescription" name="description"/>
        <attribute field="distinguishedName" name="entryDN"/>
    </user>
    <group>
        <objectClass>groupOfUniqueNames</objectClass>
        <attribute field="id" name="cn"/>
        <attribute property="setName" name="cn"/>
        <attribute property="setDescription" name="description"/>
        <attribute field="distinguishedName" name="entryDN"/>
        <attribute property="setMembers" name="uniqueMember"/>
    </group>
</config>
This file defines LDAP connection parameters (host, port, login credentials) and query filters that locate user groups for QuantServer. You can customize these queries and define multiple group filters.
For example, the following filters locate the custom group "Deltix User":
Apache DS
<groups filter="(&(objectClass=groupOfUniqueNames)(cn=DeltixUsers))" node="ou=ExternalGroups,dc=deltix,dc=com"/>
Active Directory
<groups filter="(&(objectClass=group)(cn=DeltixUsers))" node="ou=ExternalGroups,dc=deltix,dc=com"/>
Additional Logging
To troubleshoot UAC issues with LDAP, add the following logging to $EMBER_HOME/gflog.xml:
<logger name="deltix.uac" level="DEBUG">
        <appender-ref ref="safeAppender"/>
</logger>
This produces additional logging during Ember Monitor startup that describes what users and groups were discovered in LDAP.
Define Users and Groups
When your user directory is stored in LDAP or Active Directory, you need to configure QuantServer to specify which group or groups can access the Deltix QuantServer. The Deltix system builds a list of users based on these groups.
To access the system, every Deltix user must be a member of at least one group listed in the LDAP configuration. Users and groups that are not listed cannot access the system and fail the authentication phase. This approach is recommended for large organizations with many users whose entire organizational structure is defined in services like Active Directory and do not want to expose all users to Deltix.
However, directory service implementations like Apache DS lack a simple and convenient GUI to create users and groups. To simplify this task, Deltix provides a UAC Shell tool. To define your user directory, you can use the Apache Directory Studio GUI.
Complete Example of Active Directory Configuration
To configure an active directory:
- Generate a QS LDAP security file called uac-ldap-security.xml.
c:\QuantServer\bin\uacconf.cmd -home "C:\Deltix\QuantServerHome" -server ldap://192.168.1.240:389 -user "QA\Administrator" -pass password -domain "DC=QA,DC=com"
- At the root of LDAP, create a "Deltix" Organizational Unit. Update uac-ldap-security.xml to reflect this
ou=Deltix:
<groups filter="(objectClass=group)" node="ou=Deltix,DC=qa,DC=com"/>
Create individual groups within the
ou=Deltixnode and reference them within the uac-access-rules.xml file.Create individual users within the default
CN=Usersnode and add them to the groups created above. All users must belong to a group for the principal to be found.
<?xml version="1.0" encoding="UTF-8" standalone="yes"?>
<config xmlns="http://xml.deltixlab.com/internal/quantserver/3.0">
    <vendor>ActiveDirectory</vendor>
    <connection>ldap://192.168.1.240:389</connection>
    <credentials>
        <username>QA\Administrator</username>
        <key>5595172dbe6e428606c486ddd270d8eb</key>
    </credentials>
    <groups filter="(objectClass=group)" node="ou=Deltix,DC=qa,DC=com"/>
    <user>
        <objectClass>person</objectClass>
        <objectClass>user</objectClass>
        <objectClass>organizationalPerson</objectClass>
        <attribute field="id" name="sAMAccountName"/>
        <attribute property="setName" name="name"/>
        <attribute property="setDescription" name="description"/>
        <attribute field="distinguishedName" name="distinguishedName"/>
    </user>
    <group>
        <objectClass>group</objectClass>
        <attribute field="id" name="sAMAccountName"/>
        <attribute property="setName" name="name"/>
        <attribute property="setDescription" name="description"/>
        <attribute field="distinguishedName" name="distinguishedName"/>
        <attribute property="setMembers" name="member"/>
    </group>
</config>
Appendix C. Backend API Access
In this section, we will use the popular Postman tool to visualize API access. Assuming the ES Monitor is configured for OAuth2 Authentication, you can define an application authentication section as shown below:
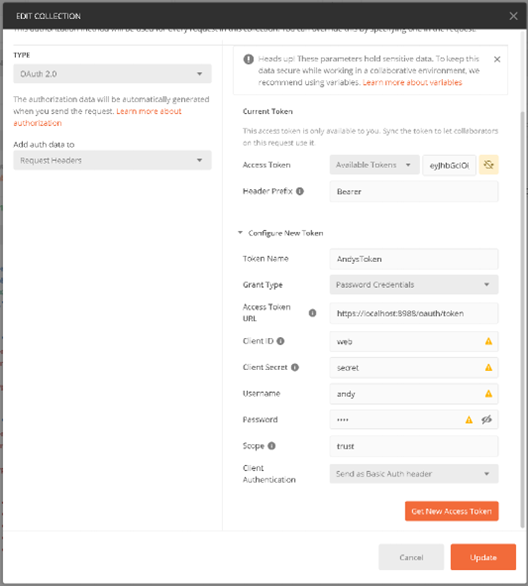
After configuring authentication, you can use backend API endpoints.
For instance, you can access a list of recent orders as shown below:
